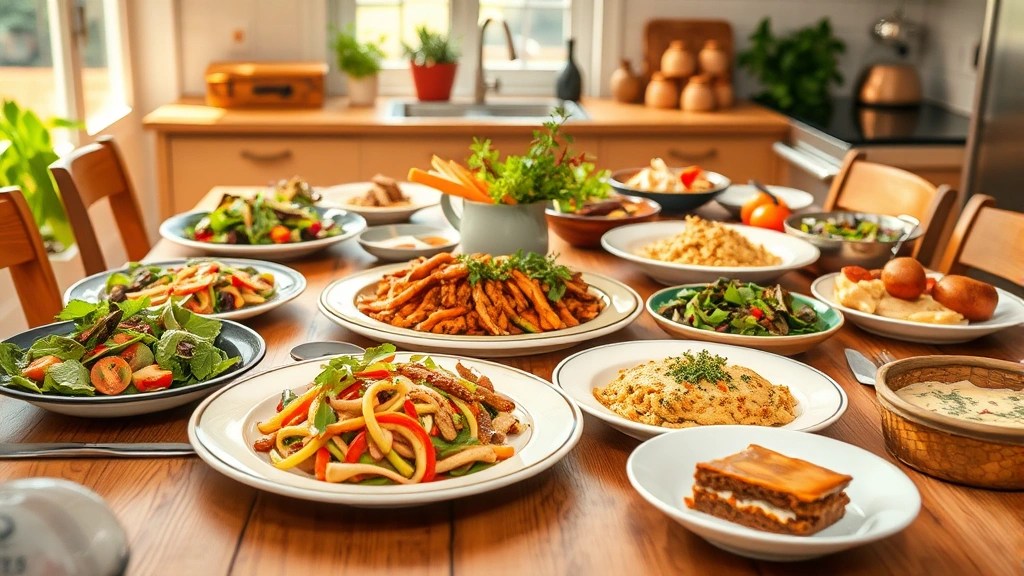
Cooking for family doesn’t have to be a chore!
With these 25 easy recipes, you can whip up delicious meals that will leave everyone asking for seconds.
From quick meals that come together in under 30 minutes to family-friendly dishes that please even the pickiest eaters, this list is your go-to guide for making mealtime memorable.
Get ready to impress your loved ones with creative flavors and beautiful presentations that make every dish a feast for the eyes as well as the palate.
Product Recommendations:
• Kitchen herb garden starter kit
1. Creamy Garlic Pasta
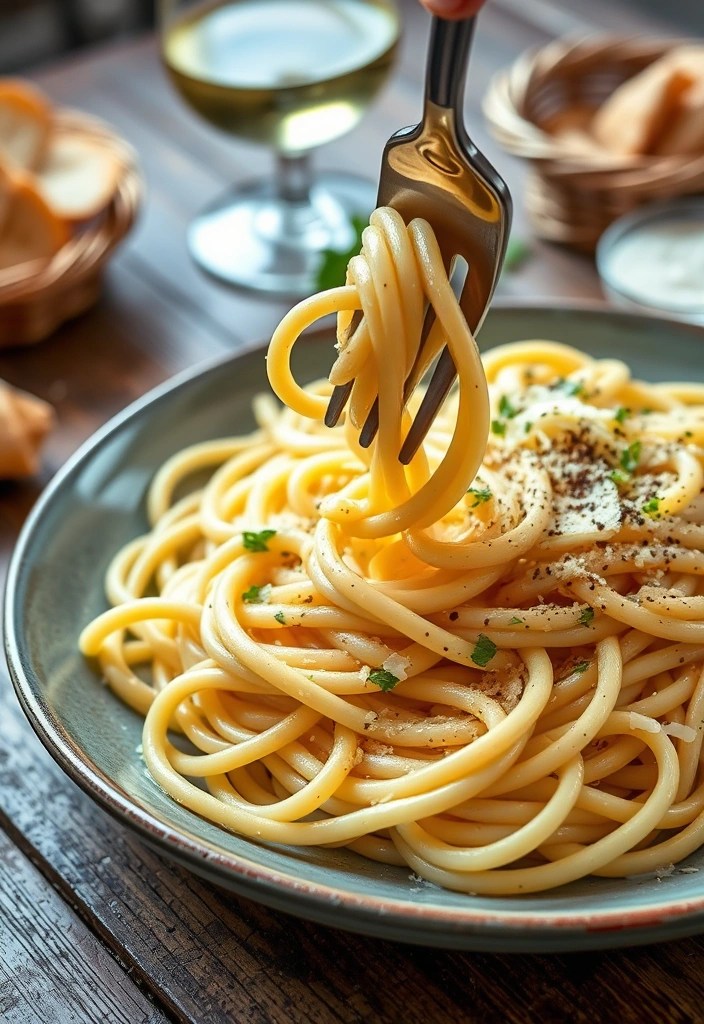
1. Creamy Garlic Pasta
This creamy garlic pasta is a quick meal that feels luxurious yet is incredibly easy to prepare.
With just garlic, cream, parmesan cheese, and your choice of pasta, you can create a dish that tastes like it came from a fine restaurant.
Toss in some sautéed spinach or grilled chicken for added nutrition and flavor. Serve with a sprinkle of fresh parsley for a pop of color and freshness. This is one recipe you’ll want to make again and again.
Ingredients:
– 8 oz pasta (spaghetti, fettuccine, or your choice)
– 4 cloves garlic, minced
– 1 cup heavy cream
– 1 cup grated Parmesan cheese
– 2 tbsp olive oil
– Salt and pepper to taste
– Fresh parsley, chopped (for garnish)
– Optional: sautéed spinach or grilled chicken
Instructions:
1. Start by cooking the pasta according to package instructions until al dente. Drain and set aside, reserving a cup of pasta water.
2. In a non-stick skillet, heat the olive oil over medium heat. Add the minced garlic and sauté for about 1-2 minutes until fragrant, being careful not to burn it.
3. Pour in the heavy cream and bring to a gentle simmer. Stir continuously for about 2-3 minutes.
4. Gradually add the grated Parmesan cheese while stirring until the cheese melts and the sauce becomes creamy. If the sauce is too thick, add a bit of the reserved pasta water to reach your desired consistency.
5. Season the sauce with salt and pepper to taste.
6. Add the cooked pasta to the skillet, tossing to coat the pasta evenly with the creamy garlic sauce.
7. If desired, stir in sautéed spinach or grilled chicken for added nutrition and flavor.
8. Serve hot, garnished with fresh parsley for an extra touch of color and freshness. Enjoy your delicious, family-friendly meal!
Product Recommendations:
2. Sheet Pan Chicken Fajitas
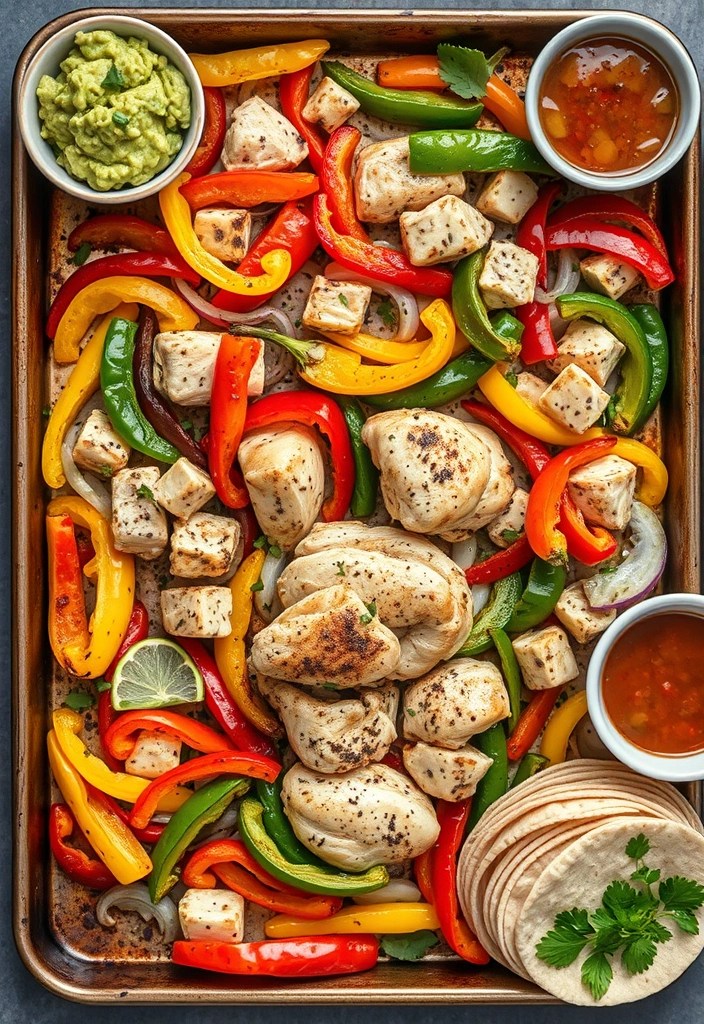
2. Sheet Pan Chicken Fajitas
These sheet pan chicken fajitas are the ultimate family-friendly meal. Simply toss sliced chicken, bell peppers, and onions with fajita seasoning, and roast them on a single sheet pan for minimal cleanup. Serve with warm tortillas, guacamole, and salsa for a fun and interactive dinner that everyone will love. This dish is not only quick to make but packed with flavor that will satisfy all ages.
Ingredients:
– 1 lb boneless, skinless chicken breasts, sliced into strips
– 1 red bell pepper, sliced
– 1 yellow bell pepper, sliced
– 1 green bell pepper, sliced
– 1 medium onion, sliced
– 2 tablespoons fajita seasoning mix
– 2 tablespoons olive oil
– Salt and pepper to taste
– Warm tortillas for serving
– Optional toppings: guacamole, salsa, sour cream
Instructions:
1. Preheat your oven to 400°F (200°C).
2. In a large bowl, combine the sliced chicken, bell peppers, and onion.
3. Drizzle the olive oil over the mixture, add the fajita seasoning, and toss everything together until well coated.
4. Spread the chicken and vegetable mixture evenly on a sheet pan.
5. Season with salt and pepper to taste.
6. Roast in the preheated oven for 20-25 minutes, or until the chicken is cooked through and the vegetables are tender.
7. Remove from the oven and let it cool for a couple of minutes.
8. Serve the chicken fajitas with warm tortillas and your choice of toppings like guacamole and salsa.
Enjoy this easy recipe that brings everyone together for a satisfying meal!
Product Recommendations:
3. One-Pot Cheesy Broccoli Rice

3. One-Pot Cheesy Broccoli Rice
This one-pot cheesy broccoli rice is not just a meal; it’s a hug in a bowl. With its creamy texture and gooey cheese, it’s a dish that brings everyone together. It’s perfect for those busy weeknights when you want something quick, satisfying, and family-friendly. Plus, it’s an easy recipe that requires minimal cleanup.
### Ingredients:
– 1 cup long-grain white rice
– 2 cups vegetable or chicken broth
– 2 cups fresh broccoli florets
– 1 cup shredded cheese blend (cheddar, mozzarella, or your favorite)
– 1 tablespoon butter
– 1 teaspoon garlic powder
– 1 teaspoon onion powder
– Salt and pepper to taste
### Instructions:
1. In a non-stick pot, melt the butter over medium heat.
2. Add the rice, garlic powder, onion powder, salt, and pepper. Stir for about 2 minutes to toast the rice slightly.
3. Pour in the broth and bring to a boil. Once boiling, reduce the heat to low, cover, and let simmer for 10 minutes.
4. After 10 minutes, add the broccoli florets on top of the rice. Do not stir. Cover again and cook for an additional 5-7 minutes, or until the rice is tender and the liquid is absorbed.
5. Remove the pot from the heat and sprinkle the shredded cheese on top. Cover the pot again and let it sit for about 5 minutes, allowing the cheese to melt.
6. Gently fluff the rice and broccoli with a fork to combine everything, and serve warm. Enjoy your comforting, cheesy delight!
This easy recipe will quickly become a family favorite, providing a delicious meal that you can whip up in no time. Perfect as a main dish or a side, you can always count on it to please even the pickiest eaters!
Product Recommendations:
4. Zesty Lemon Herb Grilled Salmon
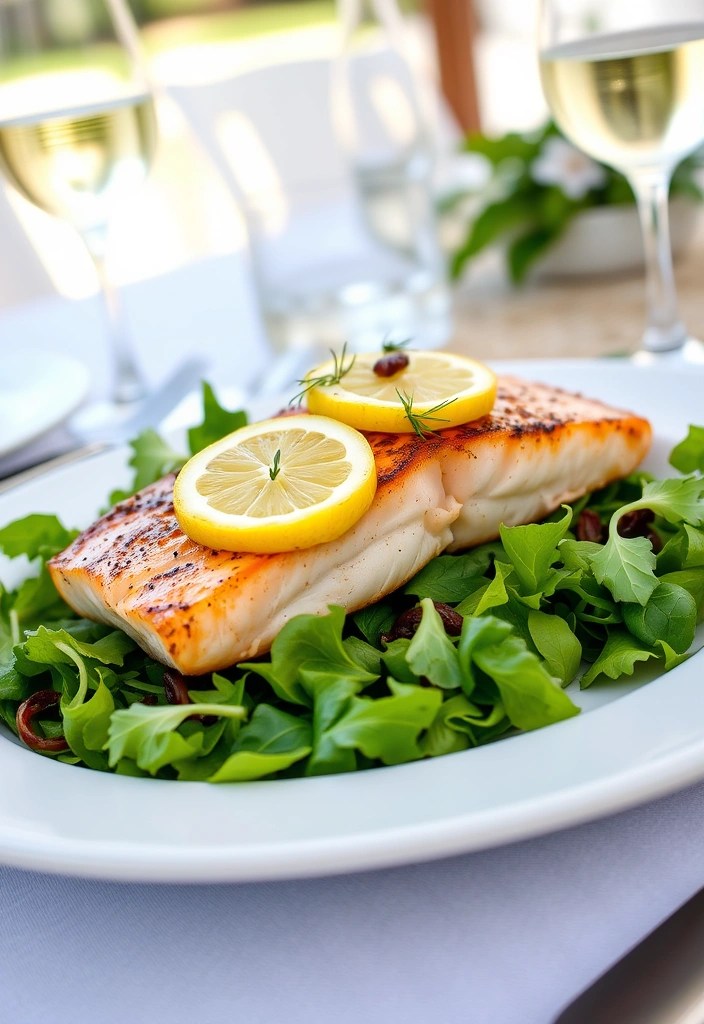
Zesty Lemon Herb Grilled Salmon is a fantastic option for anyone looking to prepare easy recipes that impress. This dish showcases the vibrant flavors of lemon and fresh herbs, making it a hit at any family dinner. Not only is it quick to make, but it’s also a healthy choice packed with omega-3 fatty acids. Pair it with quinoa or a fresh salad for a complete meal that dazzles both the eyes and the palate.
Ingredients:
– 4 salmon fillets
– 1/4 cup olive oil
– Juice of 2 lemons
– Zest of 1 lemon
– 2 cloves garlic, minced
– 2 tablespoons fresh dill, chopped (or 1 tablespoon dried dill)
– 2 tablespoons fresh parsley, chopped
– 1 teaspoon salt
– 1/2 teaspoon black pepper
Instructions:
1. In a medium bowl, whisk together olive oil, lemon juice, lemon zest, minced garlic, dill, parsley, salt, and pepper to create the marinade.
2. Place the salmon fillets in a shallow dish or a resealable plastic bag. Pour the marinade over the salmon, ensuring each piece is well coated.
3. Cover the dish or seal the bag and refrigerate for at least 30 minutes (up to 2 hours for more flavor).
4. Preheat your grill or grill pan over medium-high heat.
5. Remove the salmon from the marinade, allowing any excess to drip off. Discard the remaining marinade.
6. Place the salmon skin-side down on the grill. Cook for about 5-6 minutes on each side, or until the salmon flakes easily with a fork and has nice grill marks.
7. Remove from the grill and let rest for a couple of minutes before serving.
8. Serve the grilled salmon with quinoa or a fresh salad, garnished with extra herbs and lemon slices if desired. Enjoy your delicious, family-friendly meal!
Product Recommendations:
5. Vegetable Stir-Fry with Tofu
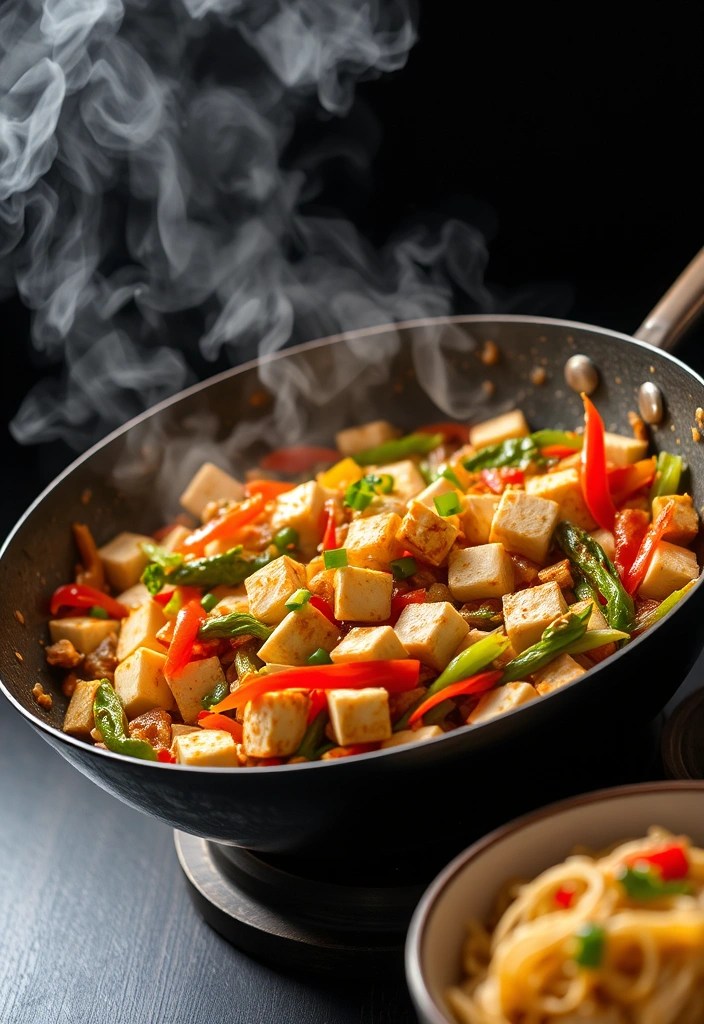
### 5. Vegetable Stir-Fry with Tofu
This colorful vegetable stir-fry is both quick and easy to make, making it perfect for busy families.
Using a medley of seasonal vegetables and tofu, this dish is packed with nutrients and flavor.
Toss everything in a savory soy sauce-based stir-fry sauce and serve over rice or noodles for a complete meal. It’s a fantastic way to get your family to eat more veggies without them even realizing it!
#### Ingredients:
– 1 block of firm tofu, drained and pressed
– 2 tablespoons of vegetable oil
– 1 red bell pepper, sliced
– 1 yellow bell pepper, sliced
– 1 cup of broccoli florets
– 1 carrot, julienned
– 1 cup of snap peas
– 3 green onions, chopped
– 3 cloves of garlic, minced
– 1 tablespoon of fresh ginger, minced
– ¼ cup of soy sauce
– 1 tablespoon of cornstarch mixed with 2 tablespoons of water
– Cooked rice or noodles, for serving
– Sesame seeds, for garnish (optional)
#### Instructions:
1. Start by cutting the tofu into bite-sized cubes.
2. Heat the vegetable oil in a non-stick wok over medium-high heat.
3. Add the tofu to the pan and cook until golden brown on all sides. Remove from the pan and set aside.
4. In the same wok, add the minced garlic and ginger. Sauté for about 30 seconds until fragrant.
5. Add the sliced bell peppers, broccoli florets, carrot, and snap peas to the wok. Stir-fry for about 5-7 minutes until the vegetables are tender but still crisp.
6. Return the tofu to the wok and pour in the soy sauce. Stir to combine.
7. Add the cornstarch mixture to the pan and stir until the sauce thickens and coats the vegetables and tofu evenly.
8. Toss in the chopped green onions and mix well.
9. Serve the stir-fry over cooked rice or noodles and sprinkle with sesame seeds if desired.
This easy recipe not only satisfies hunger but also keeps your family coming back for more! Enjoy this quick meal that is both nutritious and flavorful.
Product Recommendations:
6. Caprese Salad Skewers

6. Caprese Salad Skewers
Caprese salad skewers are a fun and festive way to enjoy this classic Italian salad. Simply thread cherry tomatoes, fresh mozzarella balls, and basil leaves onto skewers for a fresh appetizer or side dish. Drizzle with balsamic glaze for an extra touch of flavor. These skewers not only taste delicious but also look stunning on any table, making them a perfect addition to family gatherings or barbecues.
Ingredients:
– 1 pint cherry tomatoes
– 1 pound fresh mozzarella balls (bocconcini)
– Fresh basil leaves
– Balsamic glaze (to drizzle)
– Salt and pepper (to taste)
– Bamboo skewers
Instructions:
1. Start by washing the cherry tomatoes and basil leaves. Pat them dry with a paper towel.
2. Take a bamboo skewer and begin threading on a cherry tomato, followed by a fresh mozzarella ball, and then a basil leaf.
3. Repeat the process until the skewer is filled, leaving space at both ends for handling. You can typically fit 2-3 sets of tomato, mozzarella, and basil on each skewer.
4. Once all the skewers are prepared, arrange them on a serving platter.
5. Drizzle balsamic glaze over the skewers generously. Optionally, sprinkle with salt and pepper to enhance the flavors.
6. Serve immediately or refrigerate for up to an hour before serving to keep them fresh.
These Caprese salad skewers are sure to impress, making them one of the easiest and most delightful recipes to share with your family!
Product Recommendations:
7. Beef and Broccoli Stir-Fry

### 7. Beef and Broccoli Stir-Fry
This beef and broccoli stir-fry is a beloved takeout favorite that you can easily make at home. Using tender beef strips and fresh broccoli, this dish is cooked quickly over high heat with a savory sauce. Serve it over rice or noodles for a satisfying meal that’s ready in no time. Your family will appreciate the homemade touch and the delicious flavors that come together in this quick meal!
Ingredients:
– 1 lb beef (flank steak or sirloin), thinly sliced
– 3 cups broccoli florets
– 2 tablespoons vegetable oil
– 3 cloves garlic, minced
– 1 teaspoon ginger, minced
– 1/4 cup soy sauce
– 2 tablespoons oyster sauce
– 1 tablespoon cornstarch
– 1 tablespoon brown sugar
– 1/2 cup beef broth or water
– Cooked rice or noodles, for serving
– Sesame seeds and green onions, for garnish (optional)
Instructions:
1. In a bowl, combine the soy sauce, oyster sauce, cornstarch, brown sugar, and beef broth. Mix well and set aside.
2. Heat a non-stick wok or large skillet over high heat and add 1 tablespoon of vegetable oil.
3. Once the oil is hot, add the sliced beef in a single layer. Cook for about 2-3 minutes until browned, then remove from the pan and set aside.
4. In the same wok, add the remaining tablespoon of oil and stir-fry the minced garlic and ginger for about 30 seconds until fragrant.
5. Add the broccoli florets to the pan and stir-fry for about 3-4 minutes, or until they are bright green and tender-crisp.
6. Return the cooked beef to the wok and pour the sauce over the mixture. Stir well to combine and cook for an additional 2-3 minutes, until the sauce thickens.
7. Serve the beef and broccoli stir-fry over cooked rice or noodles, and garnish with sesame seeds and sliced green onions if desired.
Enjoy this quick meal that’s sure to impress your family!
Product Recommendations:
8. Spaghetti Aglio e Olio

### 8. Spaghetti Aglio e Olio
Spaghetti Aglio e Olio is the epitome of simplicity in Italian cuisine, yet it’s packed with flavor. This dish requires only spaghetti, garlic, olive oil, red pepper flakes, and parsley, making it a quick meal that impresses with its elegance. Perfect for a last-minute dinner, you can whip it up in under 20 minutes. Serve with crusty bread to soak up the delicious oil and enjoy a taste of Italy at home.
Ingredients:
– 400g spaghetti
– 6 large cloves of garlic, thinly sliced
– 1/2 cup extra virgin olive oil
– 1 teaspoon red pepper flakes (adjust to taste)
– Salt, to taste
– Fresh parsley, chopped (for garnish)
– Grated Parmesan cheese (optional)
Instructions:
1. Cook the spaghetti: Bring a large pot of salted water to a boil. Add the spaghetti and cook according to package instructions until al dente. Reserve about 1 cup of pasta water, then drain the spaghetti.
2. Prepare the garlic: While the pasta cooks, heat the olive oil in a large skillet over medium heat. Add the sliced garlic and sauté for about 2 minutes, or until it turns golden brown. Be careful not to burn it, as burnt garlic can taste bitter.
3. Add red pepper flakes: Stir in the red pepper flakes and cook for an additional 30 seconds to infuse the oil with spice.
4. Combine pasta and sauce: Add the drained spaghetti to the skillet and toss to coat it in the garlic oil. If the pasta seems dry, gradually add some reserved pasta water until you reach your desired consistency.
5. Season and serve: Taste and adjust the seasoning with salt. Remove from heat and sprinkle with fresh parsley. Serve immediately, with optional grated Parmesan on top if desired.
Enjoy your quick and family-friendly meal that’s sure to impress!
Product Recommendations:
9. Sweet and Sour Chicken

9. Sweet and Sour Chicken
This sweet and sour chicken dish brings a classic takeout favorite right into your kitchen.
With crispy chicken pieces coated in a tangy sweet and sour sauce, it’s sure to be a hit with families.
Serve with steamed rice and a side of stir-fried vegetables for a complete meal. The vibrant colors and delicious flavors make this dish not only tasty but also visually appealing.
### Ingredients:
– 1 pound boneless, skinless chicken breasts, cut into bite-sized pieces
– 1 cup cornstarch
– 2 eggs, beaten
– 1 cup vegetable oil (for frying)
– 1 cup sweet and sour sauce (store-bought or homemade)
– 1 bell pepper, chopped
– 1 cup pineapple chunks (canned or fresh)
– ¼ cup onion, chopped
– 2 green onions, sliced (for garnish)
– Steamed rice (to serve)
### Instructions:
1. Prepare the Chicken: Season the chicken pieces with salt and pepper. Dredge each piece in cornstarch, shaking off the excess, then dip into the beaten eggs.
2. Fry the Chicken: Heat the vegetable oil in a non-stick frying pan over medium-high heat. Once hot, add the chicken pieces in batches, frying until golden brown and cooked through, about 5-7 minutes. Remove and drain on paper towels.
3. Cook the Vegetables: In the same pan, add the chopped onion and bell pepper. Sauté for 2-3 minutes until slightly softened. Then, add the pineapple chunks and stir for another minute.
4. Combine with Sauce: Pour the sweet and sour sauce over the sautéed vegetables, stirring to combine. Let it simmer for a couple of minutes until heated through.
5. Add Chicken: Gently fold in the fried chicken pieces, ensuring they are well coated with the sauce. Cook for an additional 2 minutes.
6. Serve: Spoon the sweet and sour chicken over a bed of steamed rice. Garnish with sliced green onions for an extra pop of color.
Enjoy this easy recipe that transforms a takeout favorite into a delightful family-friendly meal!
Product Recommendations:
10. Mini Quiches

Mini quiches are perfect for brunch or a light dinner and can be made with a variety of fillings. Using eggs, cheese, and your choice of vegetables or meats, these bite-sized delights are both easy to make and incredibly satisfying. Bake them in muffin tins for a fun presentation, and serve with a side salad for a complete meal. They are great for meal prep, too—just pop them in the fridge for quick breakfasts or snacks.
### 10. Mini Quiches
#### Ingredients:
– 6 large eggs
– 1 cup milk
– 1 cup shredded cheese (cheddar, mozzarella, or your favorite)
– 1 cup diced vegetables (spinach, bell peppers, onions, mushrooms)
– 1 cup diced cooked meat (ham, bacon, or sausage)
– Salt and pepper to taste
– Optional: fresh herbs (parsley, chives, or thyme)
#### Instructions:
1. Preheat your oven to 375°F (190°C) and grease a mini muffin tin with non-stick spray or line with silicone baking cups.
2. In a large mixing bowl, whisk together the eggs and milk until well combined.
3. Stir in the shredded cheese, diced vegetables, and cooked meat. Season with salt, pepper, and any optional herbs you like.
4. Pour the egg mixture into the prepared muffin tin, filling each cup about ¾ full.
5. Bake for 15-20 minutes or until the quiches are set and slightly golden on top.
6. Let them cool for a few minutes before removing from the tin.
7. Serve warm or store in an airtight container in the fridge for later. Enjoy!
These mini quiches are not only delicious but also customizable to suit your family’s tastes, making them a fantastic addition to your repertoire of easy recipes.
Product Recommendations:
11. Chicken Alfredo Bake
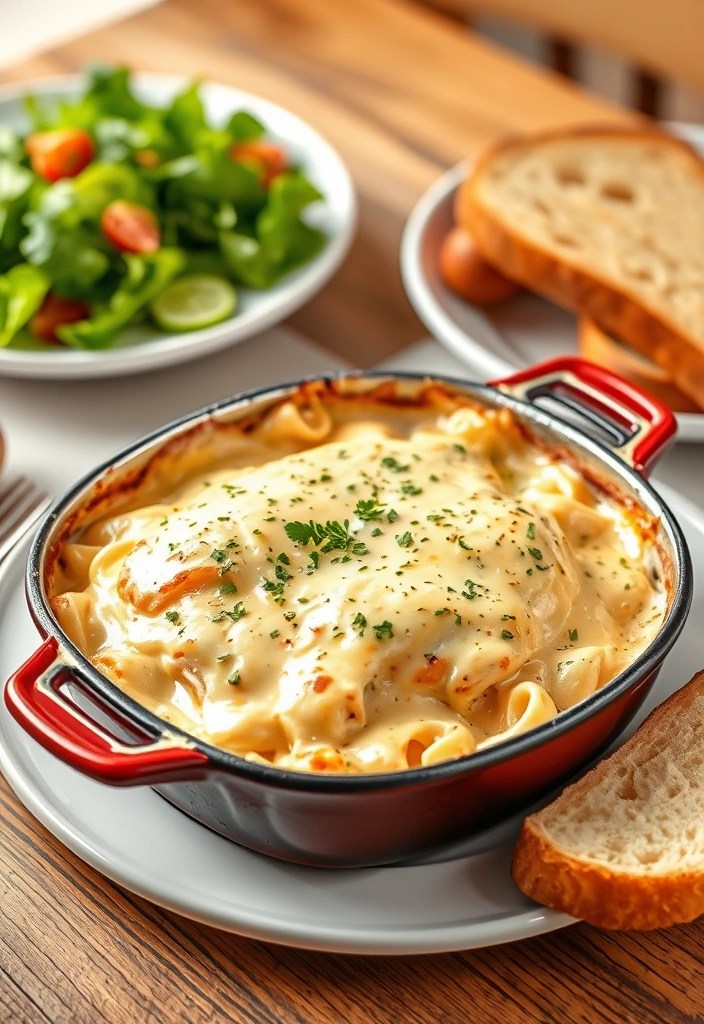
11. Chicken Alfredo Bake
This chicken Alfredo bake is a creamy, cheesy dish that your family will rave about.
Combining cooked pasta, grilled chicken, and a rich Alfredo sauce, it’s baked to perfection with a crispy cheese topping.
This comfort food classic is perfect for feeding a crowd or for meal prepping during the week. Serve it with garlic bread and a fresh salad for a complete, satisfying meal.
Ingredients:
– 3 cups cooked pasta (penne or rotini works well)
– 2 cups cooked, grilled chicken, diced
– 2 cups Alfredo sauce (store-bought or homemade)
– 1 cup shredded mozzarella cheese
– ½ cup grated Parmesan cheese
– 1 teaspoon garlic powder
– 1 teaspoon Italian seasoning
– Salt and pepper to taste
– Fresh parsley, chopped (for garnish)
Instructions:
1. Preheat your oven to 350°F (175°C).
2. In a large mixing bowl, combine the cooked pasta, diced grilled chicken, and Alfredo sauce. Mix until well combined.
3. Add garlic powder, Italian seasoning, salt, and pepper to the mixture, stirring to incorporate all the flavors.
4. Transfer the pasta mixture to a non-stick baking dish, spreading it evenly.
5. Sprinkle the shredded mozzarella and grated Parmesan cheese on top.
6. Bake in the preheated oven for 25-30 minutes, or until the cheese is bubbly and golden brown.
7. Remove from the oven and let it cool for a few minutes. Garnish with fresh parsley before serving.
8. Serve hot with garlic bread and a side salad for a delightful meal.
Enjoy this easy recipe that’s sure to impress your family with its creamy goodness and cheesy perfection!
Product Recommendations:
12. Homemade Pizza Night

Transform your dinner routine into a fun family bonding experience with a homemade pizza night! Not only does everyone get to customize their own pizza, but the process of creating these delicious masterpieces together brings laughter and creativity into the kitchen. From classic pepperoni to unique gourmet combinations, the options are endless, making it a delightful evening for everyone.
Ingredients for Homemade Pizza:
*For the Dough:*
– 2 cups all-purpose flour
– 1 packet (2 ¼ tsp) dry yeast
– ¾ cup warm water (about 110°F)
– 1 tsp sugar
– 1 tsp salt
– 1 tbsp olive oil
*For the Sauce:*
– 1 cup canned crushed tomatoes
– 1 tsp Italian seasoning
– 1 clove garlic, minced
– Salt and pepper to taste
*For Toppings (variety to choose from):*
– Shredded mozzarella cheese
– Pepperoni slices
– Sliced bell peppers
– Mushrooms
– Red onions
– Olives
– Fresh basil
– Cooked sausage
– Pineapple chunks
Instructions:
1. Prepare the Dough: In a small bowl, combine warm water, sugar, and yeast. Let it sit for about 5-10 minutes until it becomes frothy.
2. Make the Dough: In a large mixing bowl, combine the flour and salt. Add the yeast mixture and olive oil. Mix until a dough forms. Knead the dough on a floured surface for about 5-7 minutes until smooth.
3. Let it Rise: Place the dough in a greased bowl, cover it with a cloth, and let it rise in a warm area for about 1 hour, or until it doubles in size.
4. Prepare the Sauce: In a small saucepan, combine crushed tomatoes, Italian seasoning, minced garlic, salt, and pepper. Simmer for 10 minutes to meld the flavors.
5. Preheat the Oven: If using a pizza stone, place it in the oven and preheat to 475°F (245°C). If not, just preheat your oven to the same temperature.
6. Shape the Dough: Once the dough has risen, punch it down and divide it into smaller portions for individual pizzas. Roll or stretch each portion into your desired shape and thickness.
7. Assemble the Pizzas: Spread a layer of sauce over the dough, sprinkle cheese, and add your favorite toppings.
8. Bake the Pizzas: Carefully transfer the pizzas to the preheated oven (or onto the hot pizza stone) and bake for 10-15 minutes, or until the crust is golden and the cheese is bubbly.
9. Slice and Serve: Remove the pizzas from the oven, let them cool for a few minutes, then slice with a pizza cutter and enjoy your family creations!
Homemade pizza night is not just about the food; it’s about creating lasting memories with your loved ones. Enjoy the laughter, creativity, and of course, the delicious results!
Product Recommendations:
13. Spinach and Cheese Stuffed Shells

### 13. Spinach and Cheese Stuffed Shells
Stuffed shells are a classic Italian dish that can be made easily at home. Fill pasta shells with a rich mixture of spinach, ricotta, and mozzarella, then cover with marinara sauce and bake until bubbly. This dish is not only hearty but also visually impressive, making it a great choice for family dinners or gatherings. Serve with garlic bread and a side salad for a complete Italian feast.
#### Ingredients:
– 12 large pasta shells
– 2 cups fresh spinach, chopped
– 1 cup ricotta cheese
– 1 cup mozzarella cheese, shredded
– 1/2 cup Parmesan cheese, grated
– 1 egg
– 2 cups marinara sauce
– 1 teaspoon garlic powder
– 1 teaspoon Italian seasoning
– Salt and pepper to taste
– Fresh basil for garnish (optional)
#### Instructions:
1. Preheat the Oven: Preheat your oven to 375°F (190°C).
2. Cook the Pasta: In a large pot of salted boiling water, cook the pasta shells according to package instructions until al dente. Drain and set aside to cool.
3. Prepare the Filling: In a large mixing bowl, combine the chopped spinach, ricotta cheese, half of the mozzarella, Parmesan cheese, egg, garlic powder, Italian seasoning, salt, and pepper. Mix until well combined.
4. Stuff the Shells: Carefully fill each pasta shell with the spinach and cheese mixture, using a spoon or a piping bag for easier filling.
5. Assemble the Dish: Spread a thin layer of marinara sauce on the bottom of a baking dish. Place the stuffed shells in the dish, then cover with the remaining marinara sauce. Sprinkle the rest of the mozzarella cheese on top.
6. Bake: Cover the dish with aluminum foil and bake for 25 minutes. Remove the foil and bake for an additional 10-15 minutes, or until the cheese is bubbly and golden.
7. Serve: Allow the dish to cool for a few minutes, then garnish with fresh basil if desired. Serve warm with garlic bread and a side salad.
Enjoy this family-friendly meal that’s sure to impress everyone at the dinner table!
Product Recommendations:
14. Banana Oatmeal Pancakes

These banana oatmeal pancakes are a healthy twist on a breakfast favorite.
Made with oats, ripe bananas, and eggs, they are packed with flavor and nutrients.
Serve with maple syrup and fresh fruit for a delightful breakfast that will keep your family satisfied. They are easy to whip up and can be made ahead for busy mornings!
### Ingredients:
– 1 cup rolled oats
– 2 ripe bananas
– 2 large eggs
– 1 tsp baking powder
– 1 tsp vanilla extract
– 1/2 tsp cinnamon (optional)
– Pinch of salt
– Maple syrup and fresh fruit for serving
### Instructions:
1. In a blender or food processor, combine the rolled oats, ripe bananas, eggs, baking powder, vanilla extract, cinnamon, and salt. Blend until smooth and well combined.
2. Preheat a non-stick griddle or frying pan over medium heat. Lightly grease with cooking spray or a small amount of oil.
3. Pour about 1/4 cup of the batter onto the hot griddle for each pancake.
4. Cook for 2-3 minutes or until bubbles form on the surface.
5. Flip the pancakes and cook for another 2-3 minutes, until golden brown.
6. Repeat with the remaining batter, adjusting the heat as necessary.
7. Serve warm with maple syrup and fresh fruit.
These pancakes are not only delicious but also a great way to start your day with wholesome ingredients. Enjoy them as a family-friendly breakfast that everyone will love!
Product Recommendations:
15. Teriyaki Chicken Bowls
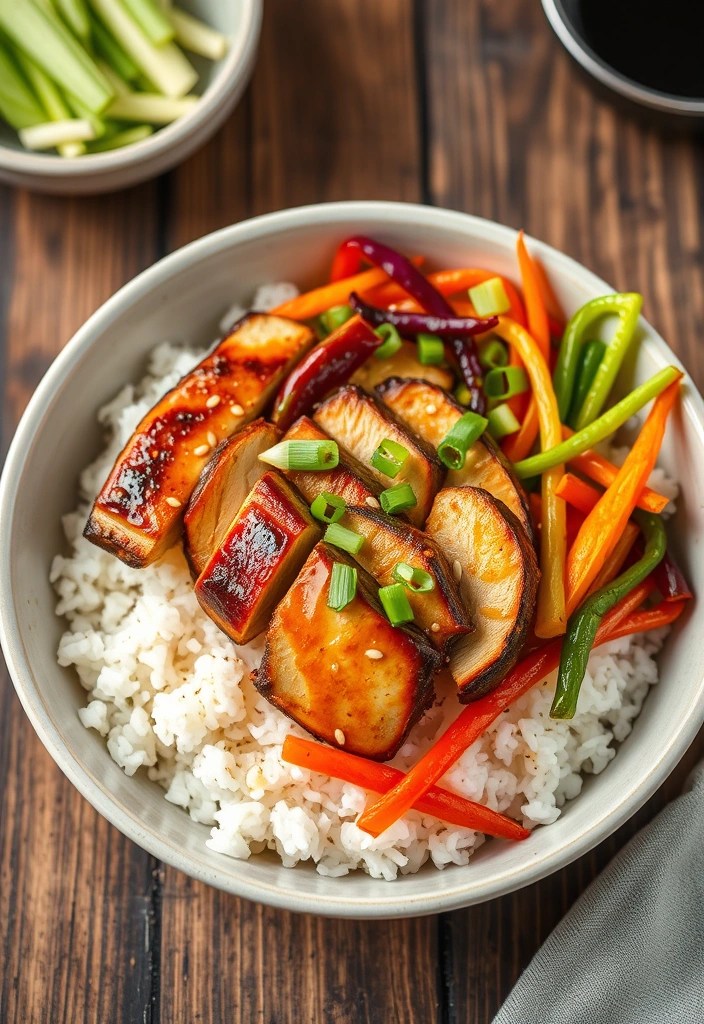
### 15. Teriyaki Chicken Bowls
Teriyaki chicken bowls are an easy meal that packs a punch. Marinate chicken in a savory teriyaki sauce, then grill or bake until tender. Serve over rice with steamed vegetables for a balanced meal that’s quick and satisfying. The colorful presentation of the vegetables against the sweet and savory chicken makes this dish as pleasing to the eyes as it is to the palate.
Ingredients:
– 1 lb boneless, skinless chicken thighs or breasts
– 1/2 cup teriyaki sauce (plus extra for serving)
– 2 cups cooked rice (white or brown)
– 2 cups mixed vegetables (broccoli, bell peppers, carrots, snap peas)
– 1 tablespoon olive oil
– Sesame seeds (for garnish)
– Green onions, sliced (for garnish)
Instructions:
1. Begin by marinating the chicken in 1/2 cup of teriyaki sauce for at least 30 minutes, or overnight for best flavor.
2. Preheat your grill or oven to 400°F (200°C). If grilling, lightly oil the grill grates.
3. Remove the chicken from the marinade, shaking off any excess sauce. Grill the chicken for 6-7 minutes on each side, or until fully cooked (internal temperature of 165°F/75°C). If baking, place on a baking sheet and bake for 20-25 minutes.
4. While the chicken is cooking, prepare your rice according to package instructions.
5. In a skillet, heat olive oil over medium heat. Add the mixed vegetables and stir-fry for about 5-7 minutes or until they are tender yet crisp.
6. Once the chicken is done, let it rest for a few minutes before slicing it into bite-sized pieces.
7. To assemble your bowls, scoop rice into each bowl, top with sliced teriyaki chicken, and add a generous portion of the stir-fried vegetables.
8. Drizzle additional teriyaki sauce over the top and garnish with sesame seeds and sliced green onions.
9. Serve hot and enjoy your delicious, family-friendly teriyaki chicken bowls!
Product Recommendations:
16. Cheesy Veggie Quesadillas

### 16. Cheesy Veggie Quesadillas
Cheesy veggie quesadillas are a quick and tasty option for lunch or dinner. Fill tortillas with cheese and your favorite vegetables, then grill until crispy and golden. Serve with salsa and sour cream for a fun, family-friendly meal that can be customized to everyone’s taste. The melty cheese and crunchy veggies make each bite satisfying and full of flavor.
Ingredients:
– 4 large flour tortillas
– 2 cups shredded cheese (cheddar, Monterey Jack, or a blend)
– 1 cup bell peppers, diced (any color)
– 1 cup spinach, chopped
– 1 small zucchini, diced
– ½ cup corn (fresh, frozen, or canned)
– 1 teaspoon olive oil
– Salt and pepper to taste
– Salsa and sour cream for serving
Instructions:
1. Prepare the Vegetables: In a pan, heat the olive oil over medium heat. Add the diced bell peppers, zucchini, and corn. Sauté for about 5 minutes until the vegetables are tender. Add the chopped spinach and cook for an additional 2 minutes. Season with salt and pepper. Remove from heat.
2. Assemble the Quesadillas: On one half of each tortilla, sprinkle a generous amount of shredded cheese. Top with a portion of the sautéed vegetable mixture, then add a little more cheese on top before folding the tortilla in half.
3. Grill: Heat a non-stick skillet over medium heat. Place the folded quesadilla in the skillet and cook for about 3-4 minutes on each side, or until the tortilla is golden brown and the cheese is melted. Repeat with the remaining tortillas.
4. Serve: Cut the quesadillas into wedges and serve with salsa and sour cream for dipping. Enjoy your delicious and easy recipe!
Product Recommendations:
17. Chocolate Chip Cookie Bars

These chocolate chip cookie bars are a delicious treat that’s simple to make.
With all the classic cookie flavors baked into a pan, they are easy to cut and serve.
These bars are perfect for family movie nights, and they disappear quickly! Serve them warm with a scoop of ice cream for an indulgent dessert that everyone will love.
### 17. Chocolate Chip Cookie Bars
Ingredients:
– 1 cup (2 sticks) unsalted butter, softened
– 1 cup brown sugar, packed
– 1/2 cup granulated sugar
– 2 large eggs
– 1 teaspoon vanilla extract
– 2 1/4 cups all-purpose flour
– 1 teaspoon baking soda
– 1/2 teaspoon salt
– 2 cups chocolate chips
Instructions:
1. Preheat your oven to 350°F (175°C) and grease a 9×13 inch baking pan or line it with a silicone baking mat for easy removal.
2. In a large mixing bowl, cream together the softened butter, brown sugar, and granulated sugar until smooth and fluffy.
3. Beat in the eggs one at a time, then stir in the vanilla extract until well combined.
4. In another bowl, whisk together the all-purpose flour, baking soda, and salt. Gradually mix the dry ingredients into the wet mixture until just combined.
5. Fold in the chocolate chips, ensuring they are evenly distributed throughout the dough.
6. Spread the cookie dough evenly into the prepared baking pan, smoothing the top with a spatula.
7. Bake in the preheated oven for 25-30 minutes, or until the edges are golden brown and a toothpick inserted in the center comes out with a few moist crumbs.
8. Allow the cookie bars to cool in the pan for about 10 minutes, then transfer them to a wire rack to cool completely before cutting into squares.
Enjoy your delicious chocolate chip cookie bars as a quick and family-friendly dessert that everyone will rave about!
Product Recommendations:
18. Mediterranean Chickpea Salad
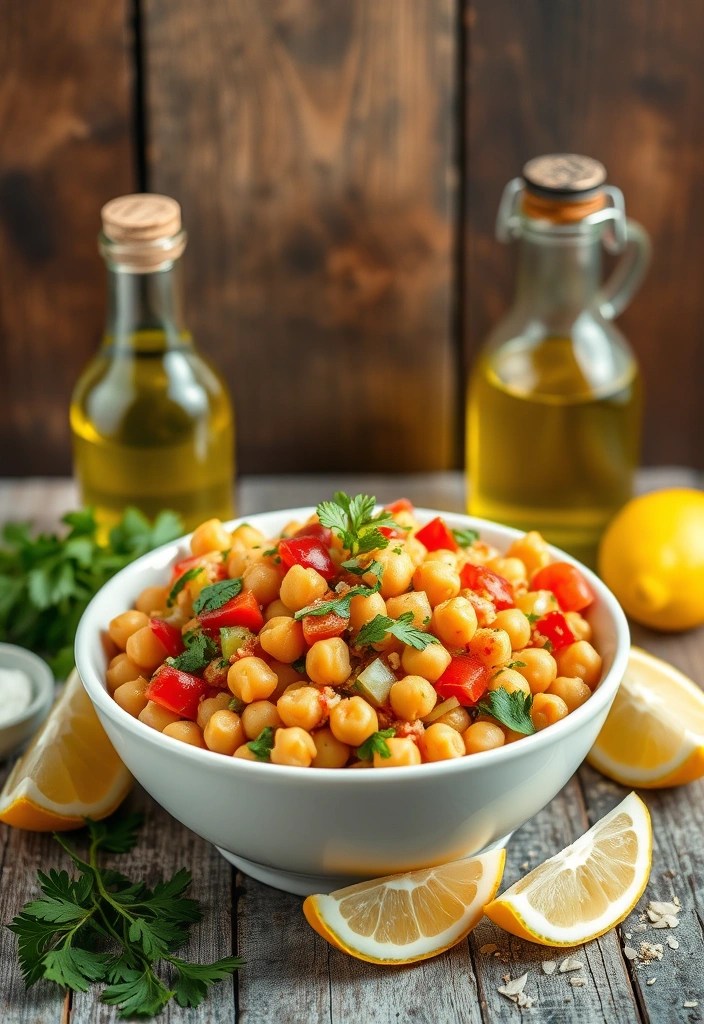
### 18. Mediterranean Chickpea Salad
The Mediterranean chickpea salad is a refreshing and nutritious dish that’s perfect for warm days.
Combining chickpeas, cucumbers, tomatoes, red onion, and parsley, it’s dressed with a simple lemon vinaigrette.
This salad is not only quick to make but also a colorful addition to any meal. Serve it as a side dish or a light lunch for a burst of flavor and health.
#### Ingredients:
– 1 can (15 oz) chickpeas, drained and rinsed
– 1 medium cucumber, diced
– 1 cup cherry tomatoes, halved
– 1/4 red onion, finely chopped
– 1/4 cup fresh parsley, chopped
– 1/4 cup extra virgin olive oil
– Juice of 1 lemon
– Salt and pepper to taste
– Optional: Feta cheese for topping
#### Instructions:
1. In a large mixing bowl, combine the chickpeas, diced cucumber, cherry tomatoes, red onion, and fresh parsley.
2. In a separate small bowl, whisk together the olive oil, lemon juice, salt, and pepper until well combined.
3. Pour the dressing over the salad mixture and gently toss until everything is evenly coated.
4. Taste and adjust seasoning if necessary. If desired, sprinkle feta cheese on top for added flavor.
5. Let the salad sit for about 10 minutes before serving to allow the flavors to meld.
6. Serve chilled or at room temperature, and enjoy this vibrant dish with family and friends!
Product Recommendations:
• High-quality olive oil dispenser
• High-quality olive oil dispenser
19. Beef Tacos with All the Fixings
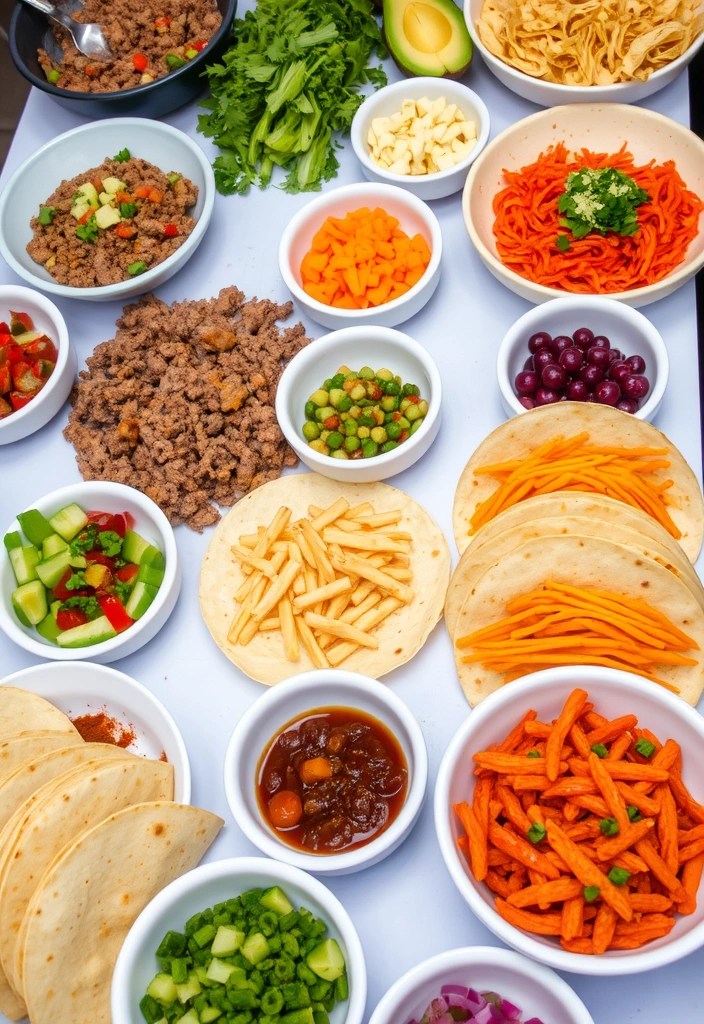
Beef tacos are a crowd-pleaser and can be customized to suit everyone’s tastes.
Season ground beef with taco spice and serve in warm tortillas with an array of toppings like lettuce, cheese, salsa, and avocado.
This hands-on meal is perfect for family gatherings, allowing everyone to build their own tacos just the way they like. It’s a fun and interactive way to enjoy dinner together!
Ingredients:
– 1 lb ground beef
– 1 packet taco seasoning mix
– 2/3 cup water
– 8 small flour or corn tortillas
– 1 cup shredded lettuce
– 1 cup shredded cheese (cheddar or Mexican blend)
– 1 cup diced tomatoes
– 1 avocado, sliced
– 1/2 cup salsa
– Optional: sour cream, jalapeños, black olives, cilantro
Instructions:
1. In a skillet over medium heat, brown the ground beef until fully cooked, stirring occasionally.
2. Drain any excess fat, then add the taco seasoning mix and water to the skillet. Stir to combine.
3. Let the mixture simmer for about 5 minutes, allowing the flavors to meld.
4. While the beef is cooking, warm the tortillas in a tortilla warmer or on a dry skillet for about 30 seconds on each side.
5. Set up a taco bar by laying out the warm tortillas and all the toppings in separate bowls.
6. Allow everyone to build their own tacos by adding the desired amount of beef and toppings.
7. Serve immediately and enjoy the hands-on experience with family and friends!
This simple and delicious recipe makes for an easy meal that everyone will love.
Product Recommendations:
20. Pumpkin Spice Muffins

20. Pumpkin Spice Muffins
Pumpkin spice muffins are a delightful treat that captures the essence of fall.
Made with pureed pumpkin, warm spices, and a hint of sweetness, these muffins are perfect for breakfast or as a snack.
Serve them warm with butter for a comforting experience that will have your family coming back for more. They also make for a great addition to any gathering during the autumn months.
Ingredients:
– 1 cup pureed pumpkin
– 1/2 cup vegetable oil
– 1 cup granulated sugar
– 2 large eggs
– 1 teaspoon vanilla extract
– 1 1/2 cups all-purpose flour
– 1 teaspoon baking soda
– 1/2 teaspoon baking powder
– 1 teaspoon ground cinnamon
– 1/2 teaspoon ground nutmeg
– 1/2 teaspoon ground ginger
– 1/4 teaspoon ground cloves
– 1/2 teaspoon salt
– Optional: 1/2 cup chopped walnuts or chocolate chips
Instructions:
1. Preheat your oven to 350°F (175°C) and grease a muffin pan or line it with paper liners.
2. In a large mixing bowl, combine the pureed pumpkin, vegetable oil, granulated sugar, eggs, and vanilla extract. Mix until well combined.
3. In another bowl, whisk together the flour, baking soda, baking powder, cinnamon, nutmeg, ginger, cloves, and salt.
4. Gradually add the dry ingredients to the wet ingredients, stirring gently until just combined. Be careful not to overmix.
5. If desired, fold in the chopped walnuts or chocolate chips for added texture.
6. Spoon the batter into the prepared muffin pan, filling each cup about two-thirds full.
7. Bake for 18-20 minutes or until a toothpick inserted into the center comes out clean.
8. Let the muffins cool in the pan for a few minutes before transferring them to a wire rack to cool completely.
9. Serve warm with butter for an extra treat, and enjoy the cozy flavors of fall!
These pumpkin spice muffins are not only delicious but also easy recipes that will impress your family with their warm, comforting flavors.
Product Recommendations:
21. Orange Glazed Carrots

21. Orange Glazed Carrots
These orange glazed carrots are a simple yet elegant side dish that will elevate any family meal. Cooked in a sweet and tangy orange glaze, they are delicious and visually appealing. This dish pairs well with a variety of main courses, adding a pop of color and flavor to your plate. They are an easy way to include vegetables that everyone will enjoy!
Ingredients:
– 1 pound baby carrots
– 1/2 cup fresh orange juice
– 2 tablespoons honey
– 2 tablespoons unsalted butter
– 1/2 teaspoon salt
– 1/4 teaspoon black pepper
– 1 tablespoon freshly grated orange zest
– Fresh parsley for garnish (optional)
Making Process:
1. Start by rinsing the baby carrots under cold water. If you’re using larger carrots, peel and cut them into uniform pieces.
2. In a medium saucepan, combine the fresh orange juice, honey, butter, salt, and black pepper.
3. Place the saucepan over medium heat and stir until the butter has melted and the mixture is well combined.
4. Add the carrots to the saucepan and bring the mixture to a gentle boil.
5. Once boiling, reduce the heat to low and cover the saucepan. Simmer for about 15-20 minutes, or until the carrots are tender but still crisp.
6. Remove the lid, increase the heat to medium, and continue cooking for an additional 5 minutes, allowing the glaze to thicken and coat the carrots.
7. Stir in the grated orange zest for an extra burst of flavor.
8. Once done, remove from heat and transfer the carrots to a serving dish. Drizzle any remaining glaze over the top.
9. Garnish with freshly chopped parsley if desired, and serve warm.
These orange glazed carrots are not just a treat for the taste buds but also a feast for the eyes, perfectly complementing any meal!
Product Recommendations:
• Stainless Steel Measuring Cups
Conclusion

Cooking for your family can be simple yet impressive with these easy recipes.
Each dish is a combination of delicious flavors and beautiful presentations, ensuring your meals are memorable.
Try these recipes and watch your family’s faces light up with joy at the dinner table!
Product Recommendations:

Leave a comment